Personal note:
I have not always been as well prepared to shoot in the field as I should have been. I searched for articles and checklists that might help me to better prepare and came across this very interesting one.
Preparation In Fine Art Landscape Photography
from Luminous Landscape
Introduction
Having a successful photography shoot depends in large part on how well prepared you are. But what does it mean to “be prepared?” And what is involved when preparing for a photography shoot? In this essay I will do my best to explain how I prepare for a shoot. I will break this preparation in two parts: what I do in the studio before I photograph, and what I do in the field when I am photographing.
This essay focuses specifically on landscape photography, which is what I do. However, with a few minor adjustments I believe it can apply just as well to other types of photography. The main difference is that each photographic subject requires slightly different equipment and knowledge. However, because I am not talking about acquiring specific equipment or knowledge in this essay, the approach I describe below should be useful whether you photograph landscapes or other subjects.
This essay focuses specifically on landscape photography, which is what I do. However, with a few minor adjustments I believe it can apply just as well to other types of photography. The main difference is that each photographic subject requires slightly different equipment and knowledge. However, because I am not talking about acquiring specific equipment or knowledge in this essay, the approach I describe below should be useful whether you photograph landscapes or other subjects.
A few words about success
We all want to be successful in our endeavors. No photographer says before leaving his or her studio: “I want this trip to be unsuccessful.” Instead, every sane photographer says: “I hope this trip is a success.” This is particularly true when travelling to a distant location to photograph for several days or weeks. Because this endeavor involves significant travel costs and commitments in time, those who embark on such trips definitely want to bring back the finest photographs possible.
Unfortunately, not everyone does bring back great photographs. Certainly, failure can be caused by factors out of our control such as adverse weather, falling ill during the trip or having an accident. However, failure is often due to lack of preparation.
Preparation is far more important than many believe. Lack of preparation affects us at the most unwanted time: when we are trying to capture a photograph of something lasting only a few minutes or a couple of seconds. At that time things go either right or wrong. Agreed, as I said above, things can go wrong for reasons out of our control. But more often than not things go wrong because we are not adequately prepared: batteries die and spares are not available, our camera refuses to function properly and we have no backup, the lens we need is in the car, or worse, at home, and so on. These are all problems that could have been prevented by spending the necessary time preparing for the trip. The purpose of this essay is to show you exactly how to do that and help you have a productive experience during your next photography shoot.
A - In the Studio
Studio preparation is preparation done before the trip. It consists of planning your trip, selecting the gear you need, and making sure this gear is in good working order.
1 - Study the Area
To study an area I have not been to before I read books on the area and browse the web looking for information and photographs. I talk or exchange emails with other photographers who have been to that area. I also look for forum threads and blog posts about this area.
I used to look at maps a lot. Today, Google Earth has replaced maps for the most part, at least for research done prior to the trip. Once on the road I still use maps, often some that I printed from my web research. I also carry detailed directions and GPS coordinates of the areas I want to visit if finding the location can be tricky.
I used to look at maps a lot. Today, Google Earth has replaced maps for the most part, at least for research done prior to the trip. Once on the road I still use maps, often some that I printed from my web research. I also carry detailed directions and GPS coordinates of the areas I want to visit if finding the location can be tricky.
2 – Look back at previous work if available
Whenever I return to a location I have photographed before, my goal is to create new images, not retake the ones I created before. Therefore, if I have already been there, I look back at the photographs taken on my previous trips to refresh my memory and to start thinking about new possibilities. I used to look at photographs taken by other photographers a lot. In fact, at some point in my career this had become an obsession. However, as I started to focus more and more on my work and on expressing my own vision, I found that I was less and less interested in the work of other photographers. Today, I rarely intentionally look at the images created by other photographers. When I do it is usually because I come across images on the web, in books or in magazines, or because someone else shows me photographs.
3 – Check your camera equipment
Before leaving for an extended trip I always go over my equipment to make sure everything is working properly. If I am taking a camera that I have not used in some time, I will take a few shots with it to make sure it works properly. I also check for dust and if necessary I dust off the sensor. I check that all the lenses are working well. Finally, I make sure my flash cards are formatted (empty of previous photographs) and that all the cards I want to take are in my card wallet.
I also make sure I am not taking unnecessary or redundant equipment. Carrying too much equipment wastes space unnecessarily, makes my bag heavier, and makes selecting the gear in the field more complicated because I have to go through more equipment to find what I want.
I also make sure I am not taking unnecessary or redundant equipment. Carrying too much equipment wastes space unnecessarily, makes my bag heavier, and makes selecting the gear in the field more complicated because I have to go through more equipment to find what I want.
4 - Take a backup camera
The only exception to this rule is that I do take a second camera body in case my main camera breaks down. That’s a must. Even the best cameras will break down, and they always do so in the field at the most inopportune time. My cameras never break down when I test them in the studio!
They break down in the field, when all the conditions required for a perfect photograph are present, usually at sunset or sunrise, when the light is fantastic and when the last thing on my mind is that my equipment will refuse to work properly.
When that happens, there is no time to be resentful or frustrated. We must be prepared with plan B, and plan B is having a backup camera, one we can switch to immediately and continue shooting as if nothing happened.
Of course, everything else can break down as well (and will eventually). Unfortunately you cannot take two of everything. Doing so would be too heavy and too expensive. However, you can always do without a specific lens, or a specific accessory if you have to. But, you cannot work without a camera body. That’s why you have to carry two of them.
5 – Take manuals and basic repair tools
Nobody likes to read manuals and manuals are often considered superfluous. That is until we need to do something that only the manual can help us with. Of course this usually happens when we are in the field and this is why we need to take the user’s manual with us when using gear we are not familiar with. If you use a laptop or a tablet reader in the field, you can take the PDF version. Personally, I prefer to take the hard copy because it is easier to read in the field.
Having the manual is important because quite often finding how to set specific functions on a digital camera I am not fully familiar with is a frustrating process. And of course, the need to set these functions only comes up when I expect it the least and need it the most.
I also like to carry basic repair tools because things will happen, and because they will happen at the worst time. Of course, I understand that with digital cameras there is hardly anything we can fix ourselves if something goes wrong. However, this is not true if you use a mechanical camera. Having the proper tools is also useful with tripods and ballheads whose screws have a way of coming loose in the field. These can be easily tightened with the proper Allen or hex wrench. These wrenches usually come with the tripod or ballhead. All you need to do is put them in your camera bag.
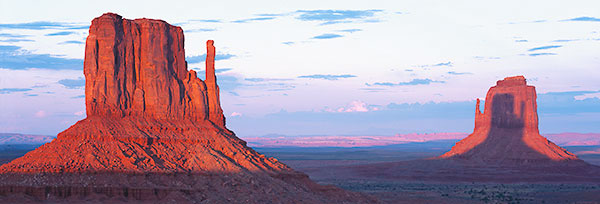
Shadow, Monument Valley, Arizona-Utah border
This photograph owes its existence to being prepared. On the day I created it I had photographed extensively because clouds made the light interesting all day long and offered a multitude of possibilities. I was using 4x5 film at the time, and I was travelling from Canyon de Chelly to Monument Valley. By the time I arrived at Monument Valley I had exposed all the film loaded in my film holders. I had spare films, and I had a changing bag, therefore I could easily reload my holders with unexposed film. However, after what I considered a successful day, I wasn’t sure if I wanted to get into the trouble of reloading film on the tailgate of my truck, in view of tourists and exposed to questions that would no doubt come my way.
I contemplated all this for a while. On the one hand I was tempted to call it a day because it was overcast and I did not expect much to happen at sunset. On the other hand, experience had taught me that things can change in minutes in the Southwest, and that no film meant no photograph… In the end my “preparation instinct” if you will prevailed and I spend 15 minutes reloading 4x5 film holders in my changing bag on my tailgate, trying to be courteous and not make mistakes while answering tourists who wondered what I used such a small tent for. That evening, I captured the scene above barely five minutes after I finished reloading my films. While I have since witnessed and photographed this scene several more times, I have never seen it so perfect in regards to the light, the shadow or the colors. Even though it may require more work than we are willing to do, preparation does pay off big time.
6 – Charge batteries
Batteries are the life-blood of the equipment therefore they need to be paid attention to carefully.
Rechargeable batteries (gear-specific batteries):I check that all batteries are charged. If I have not used a camera for some time, I make sure I have spare batteries. If camera and other gear-specific batteries get discharged quickly, I order new ones --old batteries do wear out and have to be replaced. I also buy the manufacturer’s batteries. While there are lots of cheaper, third party batteries available, they never hold a charge as long as the manufacturer’s batteries.
Disposable batteries:If I have gear that uses disposable batteries, I make sure I carry spares with me. There may be plenty of these at the store but it won’t do me much good unless I have them in my bag!
Disposable batteries:If I have gear that uses disposable batteries, I make sure I carry spares with me. There may be plenty of these at the store but it won’t do me much good unless I have them in my bag!
7 – Decide which camera you want to use
I prefer to work with a single camera system per trip. I know that carrying several systems is popular with a number of photographers, however I find that working with two systems complicates things unnecessarily. I can do it, that’s not the issue, but doing so makes it more difficult to focus on the artistic aspects of photography.
When working with several different systems I tend to focus on technical aspects. It’s just more challenging to make the equipment transparent to my artistic goals because the gear keeps calling for attention! I have noticed that most people who work with several systems at the same time keep trying to decide which system is the best for each photo opportunity instead of asking themselves what they want to express in their photographs. Things become centered on deciding which camera to use instead of deciding how to compose and how to express your personal reaction to the scene.
When working with several different systems I tend to focus on technical aspects. It’s just more challenging to make the equipment transparent to my artistic goals because the gear keeps calling for attention! I have noticed that most people who work with several systems at the same time keep trying to decide which system is the best for each photo opportunity instead of asking themselves what they want to express in their photographs. Things become centered on deciding which camera to use instead of deciding how to compose and how to express your personal reaction to the scene.
8 – Pack your bag
Packing your bag is important. There are different approaches in that regard. Some photographers like to pack their bag with everything they are taking for their trip and then make a selection about what to actually take to each specific location once they are in the field. While this approach works for some it does not work for me. Once in the field I want to be ready to photograph. The last thing I want to do is go through my bag and decide what to take and not to take to each specific location. For this reason I carry my gear in two different “containers:” a camera bag and a small Pelican case. In the camera bag I carry all the photo gear I plan to use during the trip including a second camera body and a spare battery for each battery-operated gear. In the pelican case I carry all the additional spare batteries, a sensor cleaning kit, a spare ballhead, additional flash cards and card downloader, spare lenses if I carry some of those, plus other things that I can keep in the car and get to between locations.
9 – Select the non-photographic gear you will need to take with you
This consists of clothing, shoes, etc. While these are not photographic supplies per-se, and while it is tempting to overlook them, they are necessary because having the right clothing, shoes and other essentials is important to make your trip worry free and comfortable. What these consist of is more personal than anything else. For example, I personally like to keep a pair of thin gloves in each of my jackets because I hate operating my camera with cold hands. The thin gloves I use cost only a couple of dollars and are found in outdoors clothing stores. The ridiculously low price means I can keep a large supply on hand and replace them easily if I get a hole in one of them or I lose them. The last thing I want is being uncomfortable while shooting. Besides making it difficult to operate the camera, it is very difficult, not to say impossible, to be creative when you are uncomfortable. The last thing on your mind when you are freezing is expressing your vision!
B – In the Field
Field preparation is quite different from preparation done in the studio. It is no longer about planning your trip, selecting your gear and making sure everything is in working order. Instead, field preparation is about knowing what you have to do in the field. It is about knowing when to get to the location, what to do once you are there, and how to make sure that you are doing all the things that cannot be done later on in the studio through post processing.
1 – Get to the location on time
Being prepared in the field starts with getting to the location on time. The sun rises regardless whether or not we are there ready to shoot. I like to be at my chosen location at least half and hour before sunrise in the morning and a minimum of an hour before sunset in the evening. This is because in the morning the colors in the Eastern sky are more saturated before the sun is up. This is also the perfect time to do silhouettes. Plus, I get to enjoy the feeling of mystery brought by the semi darkness. When the sun is up, it washes out all the colors and the mystery is gone.
2 – Find a spot you like
Some photographers like to get their cameras out and on their tripod the minute they get to the location. While this is a good approach if it suits you, this is not what I do. Personally, I prefer to wait until I see something before I unpack and setup my camera. In other words, the act of seeing comes first and the act of setting up my equipment comes second. After all, what if nothing catches my eye? Then I would unpack my gear for nothing. Furthermore, in the dark it is unlikely that I will find the perfect location where to set up immediately. Unless I visited the location the day before or during a previous visit, I will not know for sure where I want to setup. Therefore, unpacking my equipment at the first place I stop at will be a waste of time. Instead, I find it more productive to look for a location I like and then setup after I found that location. This is particularly important if I want to do a near-far composition because in that case the first thing I need to do is find a good foreground.
3 – Find the composition
Once I find a spot I like I visualize the composition I want to create. To do this I either compose the image in my mind or I use a viewfinder, either a cardboard or an optical viewfinder, to visualize the image. I rarely use my camera to visualize the scene, partly because I prefer to do this without the camera, and partly because my camera is still in my bag at this point.
Based on the composition I want to create, I decide which lens I will be using. For example, if I do a foreground-background composition it will be a wide angle. If I do not use the foreground, it will be anywhere from a normal to a short telephoto lens because I can tighten the composition a lot more with a longer lens. If I want to feature a lot of sky, I may use a wide angle without including the foreground but then I will tilt the camera up to minimize the land and maximize the sky. Finally, I may decide that none of the lenses I have are wide enough and I may decide to do a stitched composition, capturing the image in several frames that I will merge together into a single image on the computer once back in my studio.
Based on the composition I want to create, I decide which lens I will be using. For example, if I do a foreground-background composition it will be a wide angle. If I do not use the foreground, it will be anywhere from a normal to a short telephoto lens because I can tighten the composition a lot more with a longer lens. If I want to feature a lot of sky, I may use a wide angle without including the foreground but then I will tilt the camera up to minimize the land and maximize the sky. Finally, I may decide that none of the lenses I have are wide enough and I may decide to do a stitched composition, capturing the image in several frames that I will merge together into a single image on the computer once back in my studio.
4 – Get your gear ready
Having decided which composition and lens I want to use, I then unpack my tripod (I carry my tripod in a light tripod bag for protection against sand and rocks), I set my camera on the tripod, and I set the lens I selected on the camera. I also make sure to tighten all the knobs on the tripod and on the quick release plate securely. The few extra seconds this takes me are well worth it because this will prevent some bad surprises later on! I then proceed to compose the image in the camera viewfinder so that it matches what I saw in my mind’s eye and through my viewfinder.
5 – Expose and check histogram
Once I have composed the image the way I want it, I make the first exposure. Notice that I did not say, “I calculate the exposure.” With film, I had to calculate the exposure. With digital, because I shoot in manual mode most of the time, I simply make an educated guess about which exposure I need, and take a photograph. I then check the accuracy of my guess by looking at the histogram. Because I have been taking photographs for many years this first exposure is usually pretty close if not right on. I just know from experience what the light level is and what exposure it calls for. However, some days I am just way off, either because I am not fully awake or because of miscalculation. Either way, it doesn’t matter. Digital captures are free after you spend the first 20k on equipment (you may need to adjust this amount to fit your personal budget), so errors are not costing me anything. Not even time because even when using a light meter the first exposure is rarely spot on, especially at sunrise and sunset because the camera tends to grossly overexpose when the light level is low thinking that shadows shouldn’t be shadows.
I adjust the exposure as necessary and I usually have a correct exposure by the second capture, and if not by the third capture. Having a correct exposure means that the histogram does not show clipping in the areas that matter to me. At sunrise, to continue with this example, this means not having clipped the highlights. Because the light level is very low, there will be clipping in the shadows. This is both expected and wanted because shadows should be dark, as far as I am concerned.
If you use a light meter the same process does apply. The only difference is that you will be starting with the camera’s exposure instead of guessing the exposure yourself. After that you will have to evaluate the histogram and make over or under exposure corrections. The camera will rarely be spot-on at sunrise or sunset because calculating the proper exposure at those times is challenging. Even if it wasn’t challenging, exposure is also a matter of personal taste, which means it often needs to be adjusted even though the light conditions may be fairly easy to deal with.
6 – Fine tune the composition
Once I have found the proper exposure, I look at my composition carefully to see if it can be improved. In the dark, barely awake, and often not having coffee yet, it would be preposterous to believe that my first composition will be ideal. By making it a point to check the composition carefully, I usually find ways to improve on it by making small changes in regards to how much I include in the frame, how far or close I am to the foreground, which lens to use, and so on.
7 - Look for more
Eventually there is only so much that can be done with a given composition, and when I reach the point where I cannot think of any further improvements, I know it is time to look for another composition. Here too, it would be pretentious to think that I found the perfect spot right away. Most likely, at best I found a promising spot, but there has to be other spots just as good if not much better nearby. I therefore make it a point to walk around the area looking for other promising locations. By then it is usually lighter and the visibility is much better, making it easier to see the possibilities offered by each different spot. The light is also warming up, and some direct light may already be shining upon the landscape, bringing with it an additional visual element. I like that because it further motivates me to find a great location, or a great foreground, to continue photographing from.

White Sands Sunrise, New Mexico
Everything went wrong on the day I created this image. My camera batteries failed, the wind picked up and covered my equipment with sand, and when I thought things couldn’t get much worse, one of my tripod legs broke off. The leg literally came apart from the top of the tripod. Not because the tripod was dropped, or handed roughly. Simply because this was the time it had apparently chosen to break free.
Preparation could not do much in this instance. I had checked the tripod before the trip, I had used it for over a week, and there were no signs of upcoming failure. Neither could I do much to repair it. The only thing that saved me was the sand. I pushed the broken leg and the two other legs deep into the sand, and adjusted the tripod so that the camera was resting on all three legs. The sand held everything in place long enough to get this exposure, plus a couple more photographs a few minutes later. After that, I was able to duct tape the tripod together to make it last the rest of the trip.
Preparation couldn’t prevent this. What made getting the shot possible in this instance was looking for a solution instead of getting frustrated and discouraged. This has more to do with personal skills than with trip planning.
Personal skills are important. What matters in a situation like this is having your goals clearly defined. I was there to photograph White Sands at sunrise, not to curse at my tripod. By staying focused and clear-headed I got the job done.
8 - Don't second-guess yourself
It is easy to not take a photograph because we consider it “not good enough.” I call this “second guessing myself.” There is no shame and no cost (as we saw previously) associated with taking what may turn out to be a “bad” photograph. If it is indeed bad, just throw it away (or more appropriately, delete it from your flash card or hard drive). However, who knows if it is going to be good or bad. Sometimes, you may be correct. Other times you may make the wrong call and not take a photograph that would have been a keeper.
When working in the field when the light is changing quickly there are a multitude of things to think about. Don’t complicate your life unnecessarily by trying to decide if an image is good or bad. You will have plenty of time to do that later on in the studio. Keep it simple and don’t second-guess yourself: just take the image. Then, look if you can refine the composition, following the steps I outlined above. If you cannot refine it, move to a different spot. Field time is time that needs to be devoted to capturing images, not to criticizing images. You’ll have plenty of time to be critical later on.
9 – Focus your energy on what matters
When photographing in the field there are things you need to worry about and things you do not need to worry about. For example, you have to select the correct ISO, focus the lens properly and expose the capture correctly because none of these things can be changed later on through post processing. However, there is no need to worry about things such as white balance, color space or the exact cropping of the image because you can take care of all of that when you return to your studio. Having a checklist of what you need to do in the field and what can be done later in the studio is very helpful. I provide such a list in my second book: Mastering Photographic Composition, Creativity and Personal Style.
10 – Know when to stop
Eventually all good things come to an end. As the sun gets higher and higher in the sky, the contrast range becomes too great, the colors lose saturation and the light no longer has the magical quality it had at sunrise. When that happens, it is time to pack up and go. You can stay longer and enjoy the scenery, but for all purposes the best photographs of the morning are either on your flash cards or lost forever. It is time to move on and have breakfast.
11 – Find out what worked and what did not
The last step, and one of the most important, is finding out what worked and what did not work that morning (as well as after any shoot). This is best done after you have had some time to rest. For sunrise it is best done after breakfast for example.
What you want to do is go over what worked well and which problems you encountered, if any. Basically, you want to continue doing what worked and you want to fix what did not work. Fixing what did not work involves making changes so that you do not encounter similar problems in the future.
If you do this after each shoot you will soon find out that your success rate increases dramatically. This is because the fewer problems you have during a shoot, the more you can focus your energy towards the artistic aspects of your photography. We need to master technique so it becomes transparent to the expression of our vision and creativity. We are at our peak when our technical knowledge is such that it lets our creativity flow through uninterrupted.
The goal of preparation is making all the technical issues as transparent as possible. That way they do not stand in the way of our creativity. When technique causes problems, it becomes a barrier to creativity. Our ideas get trapped in a net of technical issues. However, when we achieve freedom from technical issues, our creativity flows freely through the maze of technical decisions we have to make.
In the next part of this two parts essay we will look at a checklist that will help you get prepared for a shoot. This second part, which is appropriately called “Preparation Checklist”, will appear on this site next month.
About Alain Briot
Alain Briot creates fine art photographs, teaches workshops and offers DVD tutorials on composition, conversion, optimization, printing and marketing photographs. Alain is also the author of Mastering Landscape Photography. Mastering Photographic Composition, Creativity and Personal Style and Marketing Fine Art Photography. All 3 books are available from Amazon and other bookstores as well from Alain’s website.
You can find more information about Alain's work, writings and tutorials as well as subscribe to Alain’s Free Monthly Newsletter on his website at http://www.beautiful-landscape.com To subscribe simply go to http://www.beautiful-landscape.com and click on the Subscribe link at the top of the page. You will have access to over 40 free essays by Alain, in PDF format, immediately after subscribing.
Alain welcomes your comments on this essay as well as on his other essays. You can reach Alain directly by emailing him at alain@beautiful-landscape.com.
Alain Briot
Vistancia, Arizona
June, 2011
Vistancia, Arizona
June, 2011
No comments:
Post a Comment